It’s easy enough, and we, The Sister’s Three, are here to tell you how.
1. Grab a scrap piece of paper and some colored pencils. Think about what type of wreath you would like to create. Determine which holiday, where you want to hang it and who you are creating it for. Sketch out an idea; think about colors and what materials you already have around the house.
2. Start gathering the basics. You will need floral wire, a hot glue gun, crafters glue, scissors, wire cutters, scrap materials, ribbons and any other essential pieces you choose.

3. Head out to your local craft store and pick up any other pieces needed. Hobby Lobby and Michaels usually have their holiday materials on sale throughout the season and, after the main event, with drastically discounted prices. Gather materials during the year and store them away for your crafting projects. Remember, step out of the box and think about different materials for your masterpiece. Wreaths don’t have to be Evergreen with basic Christmas bulbs. You can use star foam and little scrap pieces of material and finish with a bow. There are some wonderful grapevine wreaths on the market—think of the creative possibilities.
4. Lights, lights, lights. What’s a wreath if you can’t see it lit at night? Use whatever color of lights that match your theme—red, orange, purple, white, mixed—it’s completely up to you. Battery-operated lights are your best choice; they don’t get as hot and you don’t have to worry about finding that pesky plug-in or extension cord. Just make sure to keep extra batteries on hand. After you wrap the lights around the wreath, be sure to turn them on before going any further. Check out the placement and tuck in the wires.
5. Now you can lay out your design. Don’t attach anything just yet; make sure you have everything in place. Be sure to move the items around and think about other types of layouts before you settle on just one. Take a mental snap shot of how it looks so you can get everything in place.
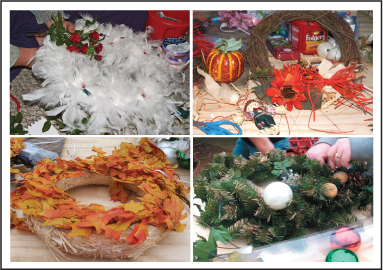
6. Start attaching the pieces. Here is where the floral wire and hot glue gun come into play. The great thing about attaching your pieces with floral wire is longevity. The items are more likely to stay in place longer when properly attached. If you hot glue your pieces together, they will start to fall off and your wreath will not be suitable for outdoor elements like rain and snow.
7. The final step is hanging your masterpiece. There are many devices sold for this purpose, and they come in all colors, shapes and sizes, but why not create your own hanger? You can attach rope, chain or a nice big bow to your wreath to hang from your front door or on the walls.
It’s as simple as that, but there are a select few who really want that special artsy craft to hang in their homes or give as gifts, but they find themselves all thumbs when it comes to thinking creatively or time-consuming tasks. Don’t’ worry; there is help for you. Many local hobby and craft stores hold classes, and if that isn’t enough help, then you can turn to professionals like The Sister’s Three who will custom-build wreaths and cute home décor items (even handmade scarves, hats, etc.) specially suited for you.
Story and craft provided by The Sister’s Three. If you need that special project built or designed, shoot us an email at thesistersthree@gmail.com.

No comments:
Post a Comment